
If you play Free Fire on an emulator, you may face many problems. For example, the cursor may not show up, the cursor may move stiffly, the mouse movement may not work properly, or you may not be able to fire without the cursor. You may also face technical issues like the cursor being locked incorrectly.
I have been playing Free Fire on PC emulators for over two years. If an emulator player creates a good custom HUD, most of these problems can be solved easily. In this blog post, we have shared a complete step-by-step guide on how to change HUD in PC for FF. This guide will be very useful for every beginner player.
What Is the Best Emulator Keymapping Setup for Free Fire PC?
The best keymapping uses WASD for movement, left mouse click for fire, right mouse click for scope, and the E key to toggle your cursor lock. Sprint goes on X, jump on Space, crouch on C, and prone on Z. This setup works across BlueStacks, LDPlayer, and GameLoop with only minor tweaks.
Here is the exact key mapping I personally use. I have tested this in over 200 ranked matches and it feels natural during real gameplay.
| Action | Key |
|---|---|
| Move | WASD |
| Sprint | X |
| Jump | Space |
| Crouch | C |
| Prone | Z |
| Backpack | Tab |
| Open / Revive | F |
| Map | M |
| Reload | R |
| Primary Weapon | 1 |
| Secondary Weapon | 2 |
| Fist / Melee | 3 |
| Gloo Wall | 4 |
| Medkit | 5 |
| Grenade | Mouse Side Button |
| Scope | Right Mouse Click |
| Fire | Left Mouse Click |
| Cursor Toggle | E |
Remember, these are the keys I personally use. If another key feels more natural for your fingers, do not hesitate to change it. The best key mapping is always the one that feels comfortable during real gameplay.
Step-by-Step Guide to Creating Your Custom HUD on PC Emulator
Follow this exact order. Skipping a step is why most players break their setup.
Step 1: Set your in-game HUD first. Launch Free Fire, go to Settings, then Controls, then Custom HUD. Arrange your buttons. Save the preset.
Before creating a custom HUD, go to the Free Fire Controls settings and Reset Your Entire HUD. Starting with a clean and default layout makes the whole customization process much easier. The goal isn’t to hide them completely. They should still be visible, but they shouldn’t block your vision in battleground.
After that, set the Fire Button, Map Button, and all other buttons to the minimum size of 10, or adjust them based on your preference for a better view during gameplay. Then, move each button to the position where you want it according to your play style.
Step 2: Open your emulator’s controls editor. In BlueStacks, press Ctrl + Shift + A. Always use strandard control scheme in BlueStacks controls editor.
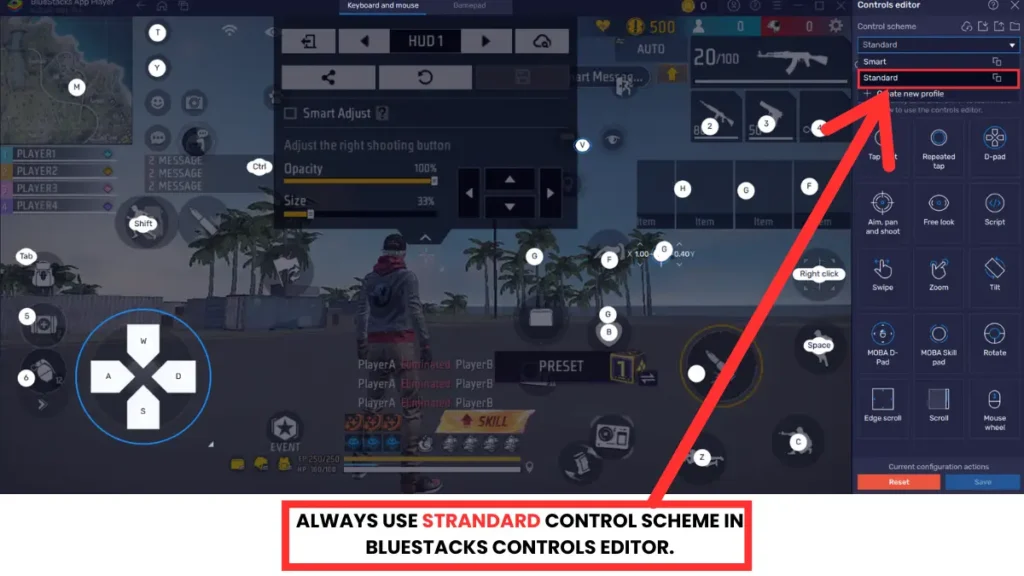
We have explained the step-by-step process for customizing the Custom HUD in Free Fire. You can follow the same process there. The same method also works for the emulator version.
This simple adjustment creates much more open space in the upper portion of the display, making enemies easier to spot during fights.
Step 3: Arrange each button. Many beginners immediately start moving the fire button around, but I don’t recommend doing that. Keeping it in its original position provides better consistency.
Step 4: Test in Training Mode. Do not jump into ranked. Spend ten minutes running, jumping, shooting, and throwing gloo walls. If a button feels off, move it.
Step 5: Save Control editor.
One common mistake is mapping keys before adjusting the in-game HUD. If the fire button is too small or too close to the edge, your mouse clicks will miss during intense fights. Always adjust the HUD first, then map the keys.
Tips: When too many buttons sit close to the joystick, movement can become inconsistent, and you may start experiencing joystick or aim-stuck issues. Keep the Joystick Area Clean
Two Ready-to-Use Custom HUD Layouts for Free Fire PC
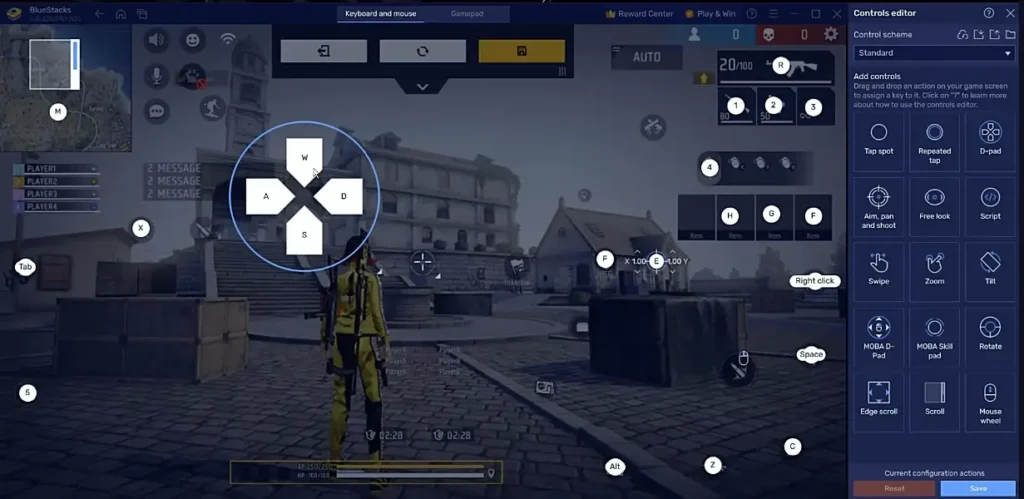
Many beginners make a common mistake by assigning a key to almost every button. Avoid doing this. The more keys you assign, the more likely you are to face joystick issues, aiming problems, and unnecessary confusion during gameplay.
I always keep my setup as simple as possible. Whenever I need to assign a key, I only click the required control and bind a keyboard shortcut to it.
Layout 1:
Layout 2:
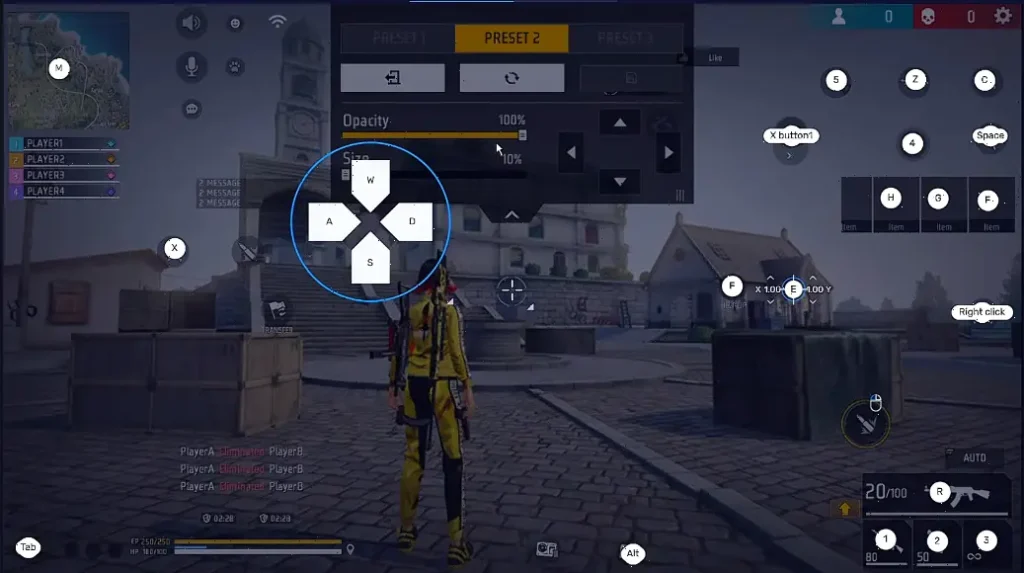
You may have noticed one thing in our layout. We have not assigned keyboard shortcuts for the Speaker, Microphone, or Voice Control. Whenever I need to use them, I simply use the mouse cursor. There is no point in assigning extra keys to controls that are rarely used during a match. The fewer keys you use, the smoother and easier your gameplay will be.
Final Word
This is the exact Custom HUD and Key Mapping setup that I’ve been using and recommending because it’s simple, beginner-friendly, and designed to eliminate common problems like joystick issues and cluttered controls.
Try these settings, spend some time getting comfortable with them, and adjust only the keys that don’t feel natural for your hand position.
If this guide helped you improve your setup, let me know your favorite key mapping in the comments.
Frequently Asked Questions
No. Mobile HUDs are designed for touch input with different button spacing and finger reach. PC emulators need larger buttons placed for keyboard and mouse mapping. You should maintain separate presets for mobile and PC.
Press F1 or your assigned cursor toggle key to switch modes. If it still drifts, check the Controls Editor and ensure the “Free look” control covers the screen center without overlapping buttons. Restart the emulator after saving.
BlueStacks 5 is best for most players due to its stable Controls Editor. LDPlayer 9 is great for high-FPS PCs. GameLoop is the safest option. Google Play Games Beta works well for casual players who want an official experience.
Open your in-game Custom HUD and check if any buttons have shifted. Adjust them back to their original positions. Then open your emulator’s Controls Editor and remap the keys to the new button locations. Always export a backup before updates.
Yes, it is safe. Garena allows official emulators like BlueStacks, LDPlayer, and GameLoop that run unmodified game files. You will only get banned if you use modified APKs, cheat tools, or unauthorized scripts.



I just like the helpful information you provide in your articles.